
🌎 English | Chinese
👉 For Visual Studio 2022: here
👉 For Visual Studio 2019: here
Visual chatGPT Studio is a powerful extension that integrates advanced AI capabilities directly into Visual Studio, enhancing your coding experience. This extension provides a suite of tools that leverage AI to assist you in various coding tasks.
With Visual chatGPT Studio, you can receive intelligent code suggestions, generate unit tests, find bugs, optimize code, and much more—all from within your development environment. The extension allows you to interact with AI in a way that streamlines your workflow, making coding more efficient and enjoyable.
Watch here some examples:
CopilotFunctionality- Features on code editor
- Edit the Commands
- Features by
Visual chatGPT Studiotool window - Automatically create comments for your GIT changes
- Features by
Visual chatGPT Studio Turbochat tool window - SQL Server Agent
- API Service Agent
- Commands Shortcuts and File/Method References
- Features by
Visual chatGPT Studio Solution Contexttool window - Features by
Visual chatGPT Studio Code Reviewtool window - Also Check Out
- Authentication
- Use Completion API for Commands
- Known Issues
- Disclaimer
- Donations
- Dependencies
- Release Notes
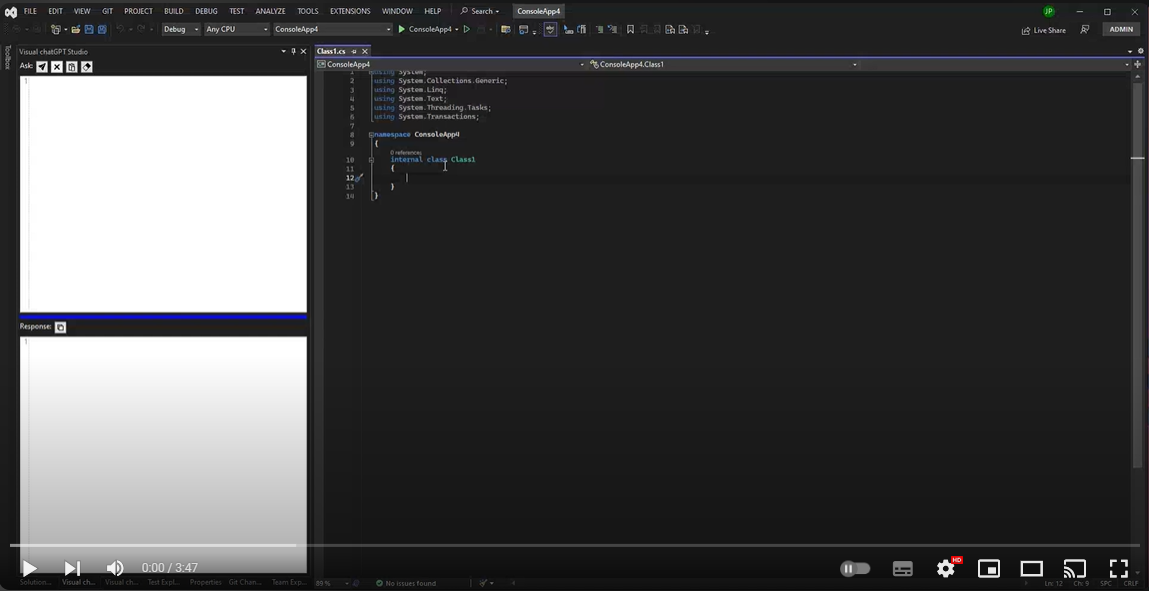
The Copilot functionality enhances your coding experience by providing intelligent code suggestions as you type.
When you start writing code, simply press the Enter key to receive contextual suggestions that can help you complete your code more efficiently. Confirm the suggestion pressing the TAB key.

You can disable the Copilot Functionality through the options if you desire.
Select a method and right click on text editor and you see these new commands:
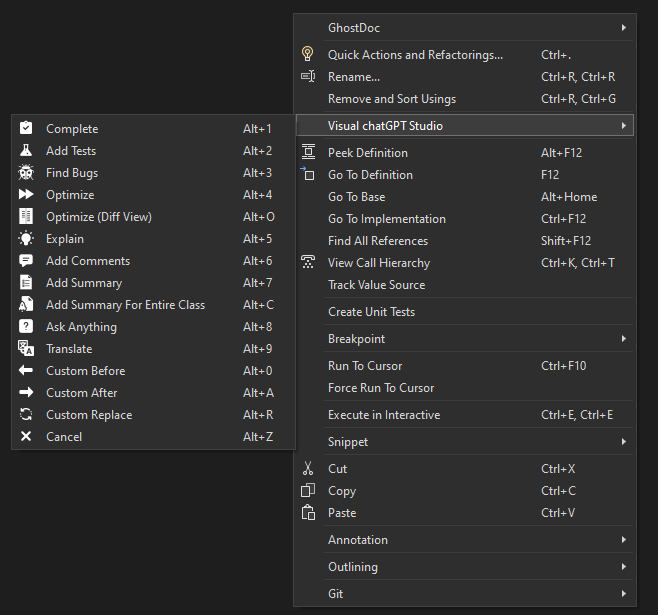
- Complete: Start write a method, select it and ask for complete.
- Add Tests: Create unit tests for the selected method.
- Find Bugs: Find bugs for the selected code.
- Optimize: Optimize the selected code.
- Optimize (Diff View): Optimize the selected code, however, instead of the result being written in the code editor, a new window will open where you can compare the original code with the version optimized by AI.
- Explain: Write an explanation of the selected code.
- Add Comments: Add comments for the selected code.
- Add Summary: Add Summary for C# methods.
- Add Summary For Entire Class: Add Summary for entire C# class (for methods, properties, enums, interfaces, classes, etc). Don't need to select the code, only run the command to start the process.
- Ask Anything: Write a question on the code editor and wait for an answer.
- Translate: Replace selected text with the translated version. In Options window edit the command if you want translate to another language instead English.
- Custom Before: Create a custom command through the options that inserts the response before the selected code.
- Custom After: Create a custom command through the options that inserts the response after the selected code.
- Custom Replace: Create a custom command through the options that replace the selected text with the response.
- Cancel: Cancel receiving/waiting any command requests.
And if you desire that the responses be written on tool window instead on the code editor, press and hold the SHIFT key and select the command (not work with the shortcuts).
The pre-defined commands can be edited at will to meet your needs and the needs of the project you are currently working on.
It is also possible to define specific commands per Solution or Project. If you are not working on a project that has specific commands for it, the default commands will be used.
Some examples that you can do:
- Define specific framework or language: For example, you can have specific commands to create unit tests using MSTests for a project and XUnit for another one.
- Work in another language: For example, if you work in projects that use another language different that you mother language, you can set commands for your language and commands to another language for another projects.
- ETC.

In this tool window you can ask questions to the AI and receive answers directly in it.
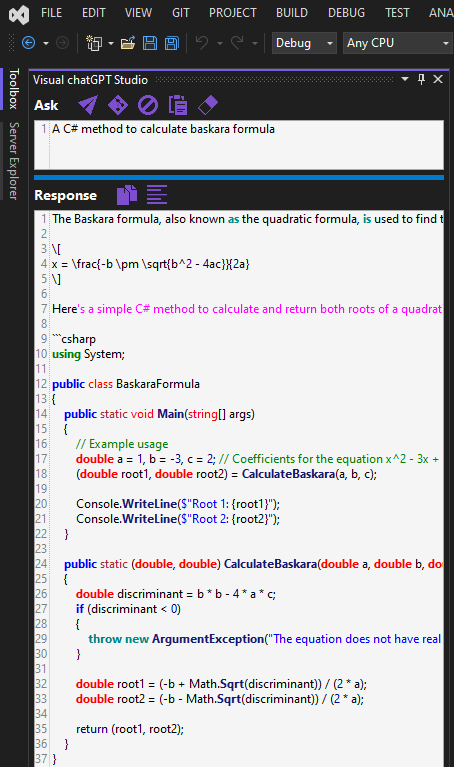
This window can also be used to redirect the responses of commands executed in the code editor to it, holding the SHIFT key while executing a command, this way you can avoid editing the code when you don't want to, or when you want to validate the result before inserting it in the project.
You will also be able to attach images and make requests such as asking for code that implements the same layout as the attached image (not all models accept images).
In this window it will also be possible to create a git push comments based on pending changes by clicking on this button:
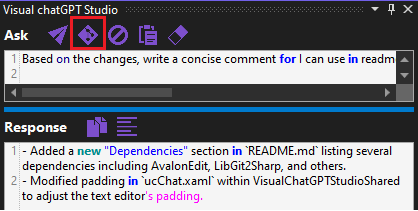
No more wasting time thinking about what you are going to write for your changes!
Through the Generate Git Changes Comment Command option of this extension, you can edit the request command. Ideal if you want comments to be created in a language other than English, and/or if you want the comment to follow some other specific format, etc.
You will find this window in menu View -> Other Windows -> Visual chatGPT Studio.
In this window editor you can interact directly with the AI as if you were in the chatGPT portal itself:
Unlike the previous window, in this one the AI "remembers" the entire conversation:

You can also interact with the opened code editor through the Send Code button. Using this button the OpenAI API becomes aware of all the code in the opened editor, and you can request interactions directly to your code, for example:
- Ask to add new method on specific line, or between two existing methods;
- Change a existing method to add a new parameter;
- Ask if the class has any bugs;
- Etc.
By executing this command, you can also hold down the SHIFT key when press the Send Code button so that the code will be write directly in the chat window instead of the code editor, in case you want to preserve the original code and/or analyze the response before applying it to the opened code editor.
You will also be able to keep multiple chats open at the same time in different tabs. And each chat is kept in history, allowing you to continue the conversation even if Visual Studio is closed:
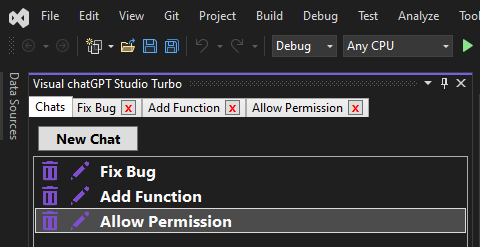
As in the 'Tool Window', it is also possible to attach images here and make requests regarding them (not all models accept images).
You will find this window in menu View -> Other Windows -> Visual chatGPT Studio Turbo.
Watch here some examples using the Turbo Chat:

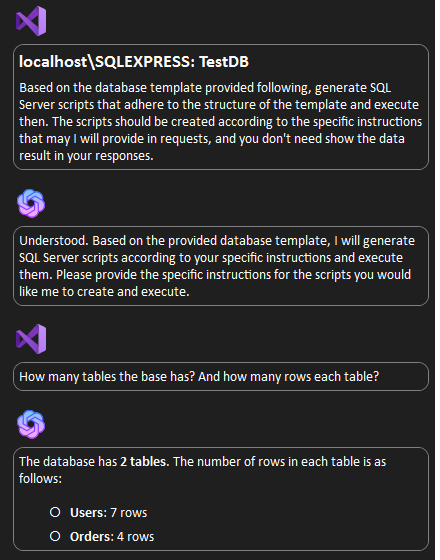
With the SQL Server Agent integrated into the Turbo Chat window, you can ask the AI to execute SQL scripts using natural language.
Follow these steps to make the most of this feature:
-
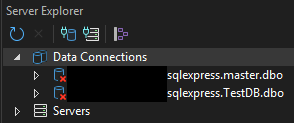
Add SQL Server database connections
In the Server Explorer window of Visual Studio, configure connections to the desired databases. Each connection must point to a specific database: -
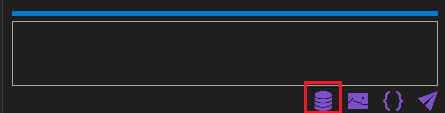
Access the database icon in Turbo Chat
In the Turbo Chat window, click on the database icon: -
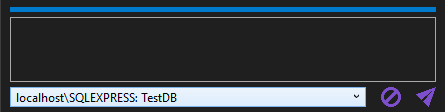
Select the database from the combobox
Use the combobox to choose which database you want the AI to work with. You can add as many databases as needed: -
Request actions in the chat
After adding the database(s) to the chat context, request any SQL action, whether DML (Data Manipulation Language) or DDL (Data Definition Language): -
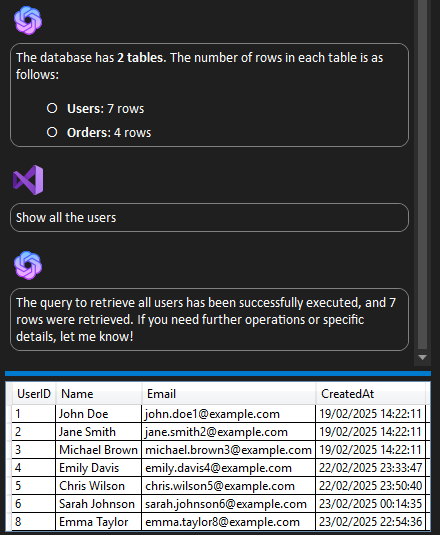
View query results
If you request a query, the result will be displayed based on the last execution performed: -
Important considerations
- The connection string is never sent to the AI. Only the server name, database name, and schema are shared.
- Query data is never sent to the AI, both for data protection reasons and to save token usage. The only exception is when the AI executes a SCALAR script (returning only one record and one column).
An AI-powered agent capable of interacting with most REST and SOAP services. It dynamically processes API structures, enabling seamless communication with various web services while keeping authentication details securely managed by the user.
Follow these steps to make the most of this feature:
-
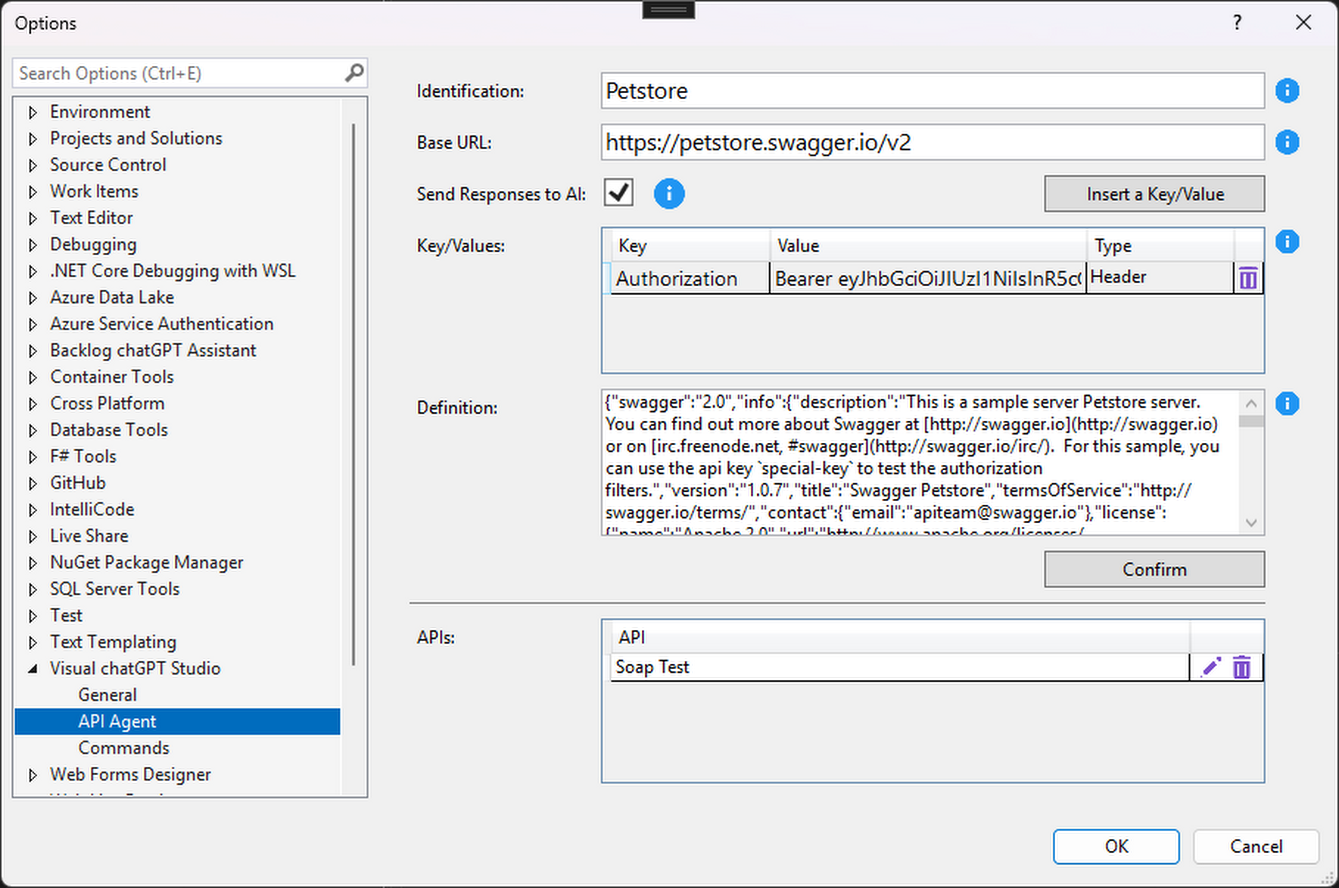
Add API definitions
In the extension options window, add definitions to the desired APIs:- Identification: Enter a unique name to identify the API.
- Base URL: Enter the base URL of the API.
- Key/Values: Define key-value pairs to be included in API requests, or to replace the key/values defined by the AI. Ideal for inserting authentication/authorization key/values, or to ensure that all calls have a certain key/value.
- Send Responses to AI: If checked, all API responses will be forwarded to the AI so it can process and retain them in its context. Otherwise, the AI will only receive the HTTP status, and the responses will be displayed directly in the chat. This option is ideal if you want to protect data and save tokens.
- Definition: Enter the API's definition (e.g., OpenAPI, Swagger, SOAP) here. This allows the AI to understand the API's structure and capabilities for making requests.
-
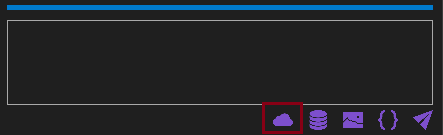
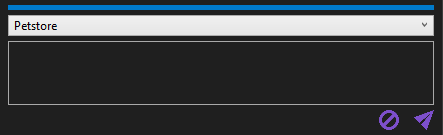
Access the 'API' icon in Turbo Chat
In the Turbo Chat window, click on the API icon: -
Select the API definition from the combobox
Use the combobox to choose which APIs you want the AI to work with. You can add as many APIs as needed: -
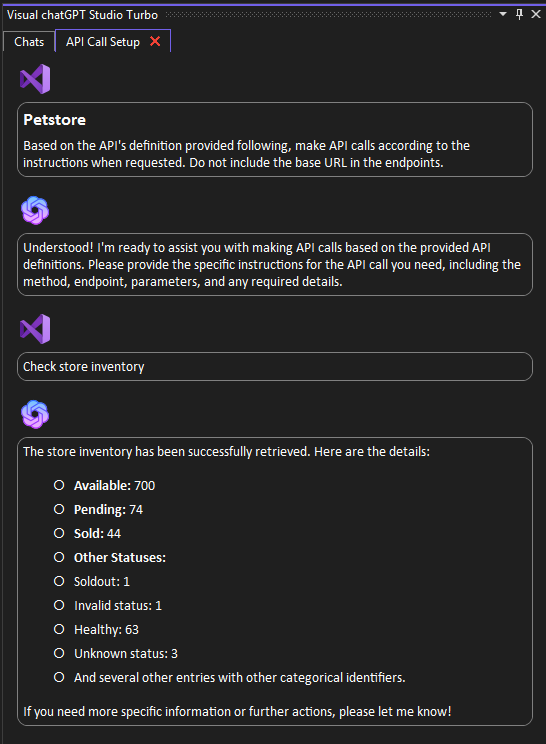
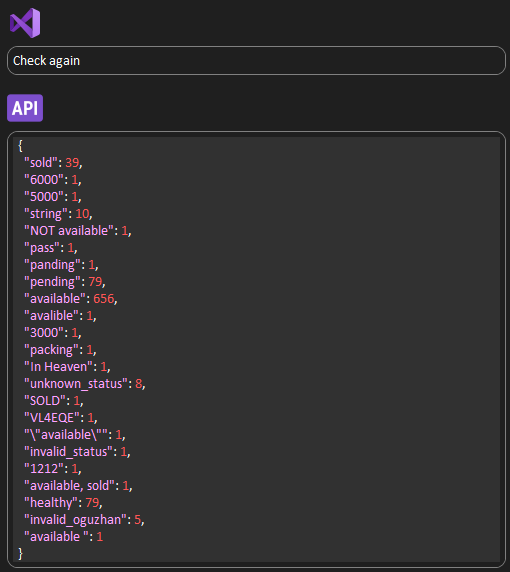
Request actions in the chat
After adding the API(s) to the chat context, make requests for AI to interact with the APIs:Or if you prefer that the AI only receives the status code from the APIs, without the actual responses (after disabled the "Send Responses to AI" parameter):
-
Important considerations
- The AI never has knowledge of the keys/values configured through the options, so they are ideal for authentication tokens.
- The AI never has knowledge of the Base URL.
- However, if for some reason you want the AI to have knowledge of the above data, you will have to inform the AI via requests.
- Depending on the type of authentication used in the API, you will have to manually authenticate, and then parameterize the token via options, or inform the authentication data via request.
- In my tests, I noticed that the AI may have difficulties dealing with complex APIs and/or complex endpoints. For these cases, I suggest trying to understand the API's difficulties through the logs in the Output Window and attempting to guide it through requests. In general, the API agent may not be suitable for complex cases.
You can reference the pre-defined commands, files and methods directly in the request fields. This means you can easily insert the pre-definied commands, as well file paths or method names into your requests, making it more efficient to work with your code.
To reference predefined commands, access them with the key "/". To reference files or methods, access them with the key "#".
Watch the demonstration of this feature in action:


Here you can add project items to the context of requests to OpenAI. Ideal for making requests that require knowledge of other points of the project.
For example, you can request the creation of a method in the current document that consumes another method from another class, which was selected through this window.
You can also ask to create unit tests in the open document of a method from another class referenced through the context.
You can also request an analysis that involves a larger context involving several classes. The possibilities are many.
But pay attention. Depending on the amount of code you add to the context, this can increase the tokens consume. And also will can reach the token limit per request sooner depending the model you are using. Set a model with large tokens limit can solve this limitation.
You will find this window in menu View -> Other Windows -> Visual chatGPT Studio Solution Context.
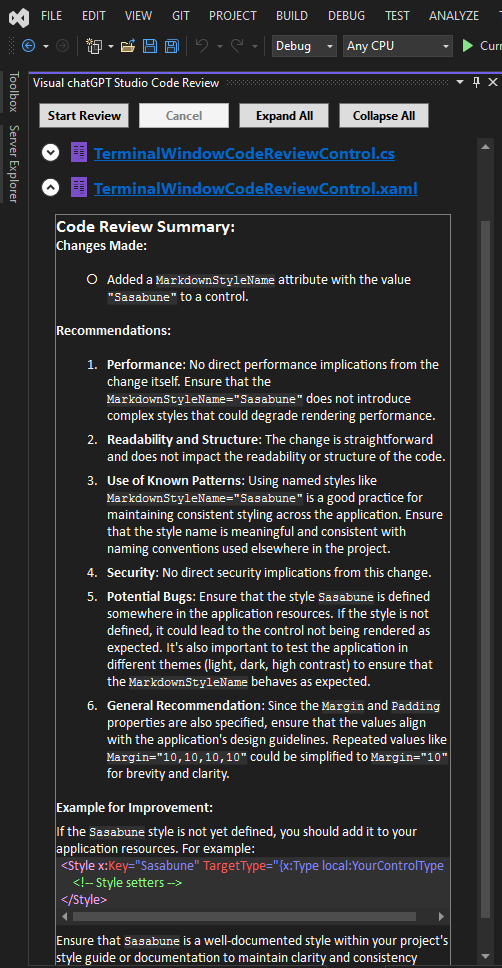
The Code Review Tool Window feature is designed to enhance the development workflow by automatically generating code reviews based on Git Changes in a project. This innovative functionality aims to identify potential gaps and areas for improvement before a pull request is initiated, ensuring higher code quality and facilitating a smoother review process.
-
Git Changes Detection: The feature automatically detects any changes made to the codebase in Git.
-
Automatic Review Generation: Upon detecting changes, the system instantly analyzes the modifications using the power of AI. It evaluates the code for potential issues such as syntax errors, code smells, security vulnerabilities, and performance bottlenecks.
-
Feedback Provision: The results of the analysis are then compiled into a comprehensive code review report. This report includes detailed feedback on each identified issue, suggestions for improvements, and best practice recommendations.
-
Integration with Development Tools: The feature seamlessly integrates with the Visual Studio, ensuring that the code review process is a natural part of the development workflow.
-
Edit the command: Through the extension options, it is possible to edit the command that requests the Code Review for customization purposes.
- Early Detection of Issues: By identifying potential problems early in the development cycle, developers can address issues before they escalate, saving time and effort.
- Improved Code Quality: The automatic reviews encourage adherence to coding standards and best practices, leading to cleaner, more maintainable code.
- Streamlined Review Process: The feature complements the manual code review process, making it more efficient and focused by allowing reviewers to concentrate on more complex and critical aspects of the code.
- Enhanced Collaboration: It fosters a culture of continuous improvement and learning among the development team, as the automated feedback provides valuable insights and learning opportunities.
If you find Visual chatGPT Studio helpful, you might also be interested in my other extension, Backlog chatGPT Assistant. This powerful tool leverages AI to create and manage backlog items on Azure Devops directly within Visual Studio. Whether you're working with pre-selected work items, user instructions, or content from DOCX and PDF files, this extension simplifies and accelerates the process of generating new backlog items.
To use this tool it is necessary to connect through the OpenAI API, Azure OpenAI, or any other API that is OpenAI API compatible.
1 - Create an account on OpenAI: https://platform.openai.com
2 - Generate a new key: https://platform.openai.com/api-keys
3 - Copy and past the key on options and set the OpenAI Service parameter as OpenAI:

1 - First, you need have access to Azure OpenAI Service. You can see more details here.
2 - Create an Azure OpenAI resource, and set the resource name on options. Example:


3 - Copy and past the key on options and set the OpenAI Service parameter as AzureOpenAI:


4 - Create a new deployment through Azure OpenAI Studio, and set the name:


5 - Set the Azure OpenAI API version. You can check the available versions here.
6 - Optional: Instead of allowing the extension to automatically build the connection URL to Azure OpenAI from the parameters 'Resource Name', 'Deployment Name', and 'API Version', manually define the connection URL through the 'Azure URL Override' parameter, which is ideal for cases where the endpoint for Azure OpenAI is custom for some reason. When a value is set for this parameter, the other parameters ('Resource Name', 'Deployment Name', 'API Version') will be ignored.
In addition to API Key authentication, you can now authenticate to Azure OpenAI using Microsoft Entra ID. To enable this option:
1 - Ensure your Azure OpenAI deployment is registered in Entra ID, and the user has access permissions.
2 - In the extension settings, set the parameter Entra ID Authentication to true.
3 - Define the Application Id and Tenant Id for your application in the settings.
4 - The first time you run any command, you will be prompted to log in using your Microsoft account.
5 - For more details on setting up Entra ID authentication, refer to the documentation here.
Is possible to use a service that is not the OpenAI or Azure API, as long as this service is OpenAI API compatible.
This way, you can use APIs that run locally, such as Meta's llama, or any other private deployment (locally or not).
To do this, simply insert the address of these deployments in the Base API URL parameter of the extension.
It's worth mentioning that I haven't tested this possibility for myself, so it's a matter of trial and error, but I've already received feedback from people who have successfully doing this.
This feature introduces the ability to utilize the Completion API for handling command requests within the code editor. When enabled, all requests for code completion will use the Completion model and API instead of the Chat API. This feature is particularly useful for scenarios where specific tuning of parameters for completions is better.
Note: This functionality does not support Azure OpenAI API.
How to Enable the Feature:
- Open the Options for the extension within Visual Studio.
- Navigate to the General category.
- Locate the Use Completion API for Commands setting and set it to True.
- Configuring Completion Parameters
- Issue 1: Occasional delays in AI response times.
- Issue 2: AI can hallucinate in its responses, generating invalid content.
- Issue 3: If the request sent is too long and/or the generated response is too long, the API may cut the response or even not respond at all.
- Workaround: Retry the request changing the model parameters and/or the command.
-
As this extension depends on the API provided by OpenAI or Azure, there may be some change by them that affects the operation of this extension without prior notice.
-
As this extension depends on the API provided by OpenAI or Azure, there may be generated responses that not be what the expected.
-
The speed and availability of responses directly depend on the API.
-
If you are using OpenAI service instead Azure and receive a message like
429 - You exceeded your current quota, please check your plan and billing details., check OpenAI Usage page and see if you still have quota, example:

You can check your quota here: https://platform.openai.com/account/usage
- If you find any bugs or unexpected behavior, try first updating Visual Studio to its latest version. If not resolved, please, leave a comment or open an issue on Github so I can provide a fix.
☕️ If you find this extension useful and want to support its development, consider buying me a coffee. Your support is greatly appreciated!

- Added the ability to request the AI to call REST and SOAP APIs on one or more endpoints through the Turbo Chat window.
- Fixed git-worktree repository detection logic (thanks Kryeker).
- Added the new 'Azure URL Override' parameter on options, to manually define the Azure OpenAI connection URL instead of using 'Resource Name', 'Deployment Name', and 'API Version'. This is useful for custom endpoints.
- Added the new 'Completion Base API URL Override' parameter on options, to possibility change the Completion API connection URL if you wish to do so for some reason, for example use a custom LLM deployment specific only for the Completions.
- The visualization of the results of a query performed by the SQL Agent has been fixed when many records are returned.
- Added the ability to request the AI to execute SQL Server scripts on one or more databases through the Turbo Chat window.
- Refactoring to remove the dependency on the library OpenAI-API-dotnet, and add its source code as a project in the Solution, making it possible to customize it.